Tuesday, May 5, 2015

Project 4 Review

Project 4: Client Website

Goal: Create a client website displaying his artwork.
Client: Sam E. Berland Cartoonist
Softwares:
  • Photoshop
  • Dreamweaver 
  • Flash 
  • Javascript 
  • jQuery 
  • CSS 
Team PowerLadies:
  • Giselle Vanegas 
  • Akampreet Kaur 
  • Malaysa Miranda 
Me and my team decied to use one shared dopbox folder. Wr maded it Proejct 4 and kept it organized s, everyone would know where all the pages are located. We used HTML, CSS, Javascript, and jQuery for all the pages.
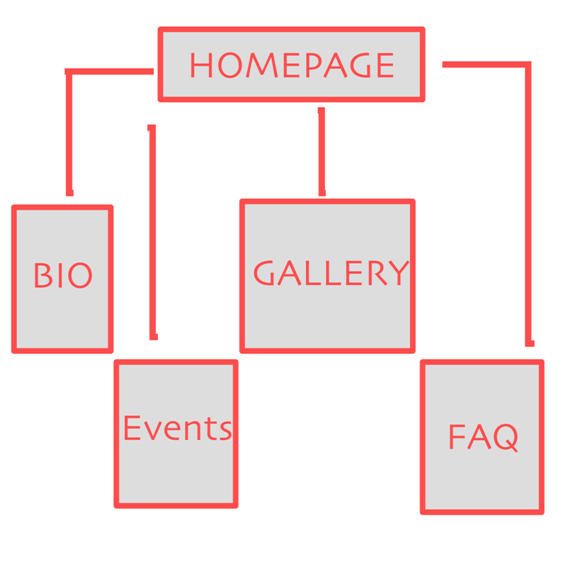


In this site map it shows the web pages of Sam Berland's website. The squares show the Web Pages we planned to have in the website. The arrows show where the pages are located. The navigation would be used in every page to make the website easier for the user to use.



For the layout, we decided to use a color combo to make the colors
match on our website.


                                           We used CSS to build up our layout.      
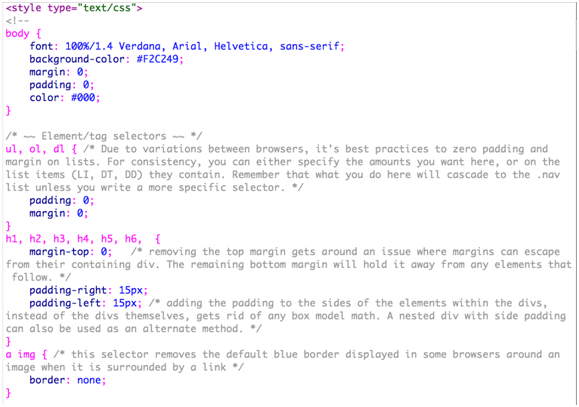
                                              Some examples of the CSS-Assets


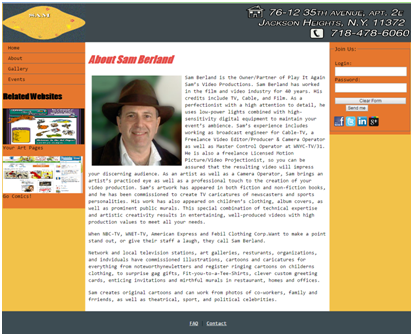
  Final Site


HOME PAGE


ABOUT PAGE


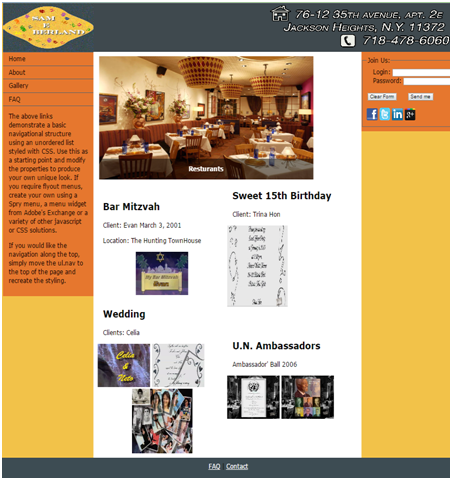
GALLERY PAGE


EVENTS PAGE


FAQ  PAGE


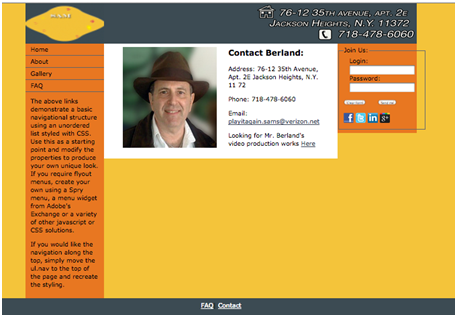
CONTACT PAGE


In project 4, I learned a lot about web design skills and working as a team. I am usually not that good using time management but having a great group really helps. We were very organized and planned everything well. In this project, I did the gallery,events, and the contact page. I competed them on time I was supposed too. Malaysa did the events page but I just worked a little bit more on it since, she was working on something else. One of the thinsg I learned during this project was using the <div> tags, we used CSS for our layout and it helped me improve my CSS skills.

     Overall, I think this project went very well because we had everything well planned. I think dividing the pages was a good idea so, everyone has a page to do. I had fun doing the gallery and putting Mr. Berlands's work together. Since, I am always a leader on group projects, it was a bit different this project because Malaysa was the leader. However, it was a great experience and I learned to develop great teamwork skills.

Friday, March 20, 2015

Project 3 Review

For project 3, we had to create a website on everything we learned about the financial and management world. My group decided the theme to be old vs new economy for our website. I created the logo for my team name (TAJD) and added it on every page. Our theme colors was grey, green, and blue which we kept on every page. 


On our homepage, we made a banner where we included the money sign black/white and colorful to represent our theme (Old vs New). 


On the second page, we made a page explaining the difference between old economy and the new. We decided to put all the information in a chart to divide the two topics. 


The third page was about economy and the three main causes of it including inflation, salary, and devaluation. We made chart that increase/decrease when you visit the website using jquery. Going back to the chart idea, we did the same thing for the third page, dividing the different topics in 3 columns. 


The fourth page we made was about businesses today and what are the requirements to have a business.  


The fifth page was about consumer choices explaining how we as consumer help the economy make choices. 


The last page was a contact us page where we included our images and a contact form.


In order to do this project, we had to do a lot of planning and research. First, we created wireframes to help us give an idea to what we were creating. We had to do a lot of research about the topic we included throughout the pages. We divided up the work. I was in charge of putting all the pages together and making the layout. In addition, I did the research for the old economy vs new economy page and the choices page. James did the research for inflation; Tenzin did the research for salary and for the businesses page. ; Demetri did the research for  devaluation. We all divided up creating logos/sliders also. I think we improved a lot from what we started with because we had a whole different idea of how this website was going to look like. As we get along the way, we improved and ended up with this idea. We worked as a great team because everyone was doing something and we all communicated great. Project 3 taught me great team work and more advanced javascript/jquery. In addition, doing this website, I learned a lot about the economy and how it improved along the way.

Thursday, February 26, 2015

Career & Financial Management Part 2


        Teacher
 (New York City)
    Web Designer     
    (Los Angeles)
     Kindergarten   
     Teacher (Paris)
Salary
$45,530
$67,000
$23,000
Gross Monthly
$3,794
$5,583
$1,916
Net Salary
$682.92
$1,005
$345

   Gross salary is an aggregate amount of wages received on a regular basis, usually weekly, biweekly, or monthly prior to any deductions such a federal and state taxes. An individual's gross salary is one factor that is used by creditors to determine if credit will be extended to the individual and his/her ability to repay the funds. On the chart above, you can see the three gross salary in different city's. The total cost of my living expenses is $723.92. Net salary is the salary which is left deducting tax and National Insurance contributions. One of the good things about calculating your expenses is you know how much you will have after all your spending or to see if you will have enough to pay your expenses. The net salaries I calculated: of a teacher in New York City  ($682.92), web designer in Los Angeles ($1,005), and Kindergarten teacher in Paris ($345). 

   Calculating my gross salary and net salary now will help me a lot in the future. Creating a plan will make everything easier because you know what you have to do in order, to reach a certain point.Since my net salaries is not a lot so, I might have to do a little of budgeting. Budgeting can help me manage my living expenses much easier. I have to spend according to what I need most so, I don't spend a lot and still have some extra money for emergencies. Doing all the calculations on the household budget worksheet, I realized you have spend carefully because you have to pay fixed expenses, have some savings, and living expenses.


       How to Budget :
1. Forecast your monthly income
2.Forecast your monthly expenses
3.Balance your worksheets
4. Spend according to your plan
5. Compare your actual earning and spending with your targets
6. Repeat the process

Tuesday, February 24, 2015

Career & Financial Management Part 1

 In 5 years, I see myself graduated from college and having a job to keep me financially stable.  In order for that to happen, I need to make SMART goals and create a good plan to follow.

What does a Goal need to have :
1. Be realistic : A car
2. Be specific: Honda CR-V 
3. Have a deadline: 5 Years
4. Have a price tag: $23, 445

One of my goals in 5 years is to have a car most likely a Honda CR-V. Honda CR-V costs about $23, 445. In order to achieve my goal of wanting a car, I am going to follow SMART goal setting. My target of achieving this goal would be in 5 years most likely after I graduated from college. 


One of the most important things I would do while I am trying to achieve my goals is by breaking them into small steps. For example, I would start by saving money and then, getting a job to save up for buying a car. These steps are called "milestones" meaning major tasks needed to reach the goal. Each of these milestones will help me achieve my goal. Having a goal map/written plan today will help me have a idea of what I want to achieve. If I start saving money today, it will help me achieve my future goals even faster than I think about it. Another thing to remember while I am trying to achieve my goal is my budget. Having a budget will help me save money and let me know up to what price I can spend. 


                How to Budget :
1. Forecast your monthly income
2.Forecast your monthly expenses
3.Balance your worksheets
4. Spend according to your plan
5. Compare your actual earning and spending with your targets
6. Repeat the process


                                                                 A Goal Map

Friday, February 13, 2015

CTE EXPO


On February 12, 2015, ITHS had an CTE EXPO for the freshman's. All 3 CTE classes (Web Design, Video Production, Apple) participated in this. Basically this CTE EXPO helped freshman's make their final decision while, picking the academy they want to go to. I remember a teacher giving a presentation about the different academies when I was a freshman, it really helped me a lot so, I tried my best to help answer all the questions the freshman's had doing the expo. The posters we created were lined up in the center on the tables so, the freshman's can walk around to look at our work.

The Expo was a great experience because I got to introduce freshman's to web design. I went to the Expo during periods 1, 4, 5/6, and 7. It was a lot of fun displaying my work to them. They asked me a lot of questions including what we do, what softwares we used to create our websites, etc. I loved the expo during these 3 years of web design because I get to help freshman's who really are interested in a CTE class answer their questions.
Who : Web Design / Video Production / Apple
Where : ITHS
When : February 12, 2015
What : The importance of a CTE Expo was to help freshman's give a idea of what each academy is.
How: By displaying our work to the freshman's we give them a idea of what they will be doing in the CTE class they choose.

Sunday, February 8, 2015

Work Process of a Web designer


The first step of creating a website for a client is to learn their requirements such as their target audience and goals of their website. Learning your clients exact requirements will help you save money and time. In addition, it will give you a idea of what to create.


The second step is to create a draft of how the website will look like such as a wire frame or a storyboard. A wire frame is a blueprint that includes the arrangement of a website’s content using a navigation diagram showing how the pages are organized and where the future web pages are expected to be designed. A site map is a list of pages of a website accessible to users. A story board is a sequence of drawings, typically with some directions, representing the outline for a website.

After you are done creating the wire frames and a storyboard, you need to get your clients approval. If your client doesn't give a approval, you have to redo this step until, they say yes to the design. This step will help save money and time also because you only have to change stuff on a draft instead, of starting your coding all over again.


The fourth step is to work on the website where you start writing the coding. You have to develop the website as per as your client's requirements and this is where where a wire frame and a storyboard will help you. Instead, of asking your client where you want the buttons, you can just look at your storyboard to see where it belongs.

The next step is to upload your website and troubleshoot. Look over all the pages and see if all the pages/links work properly. Fix anything that doesn't work.

After you are done troubleshooting, show the website to your client. Your client may or may not approval. If your client doesn't approval, go back to step one and start over as many times you have to make the perfect website for your client.


                                              Process of a web designer :

As a web designer, following the work process of a web designer helps a lot. Creating wire frames before creating a website helps me a lot because it gives me a idea of what I am trying to create, Troubleshooting can be difficult at times but looking over the code, you end up finding your mistake. Having to re-do a website can be a lot of work if it doesn't match the target audience or the goals but if you divide your time, it helps you a lot. Time management has to be the most important thing as a web designer because if you use your time wisely it will help you a lot in the future.

Tuesday, February 3, 2015

Fall Term Reflection

In the Fall term, I must say I am quiet impressed about my grade I got. It was so awarding to me because I tried and worked my very best. During the fall, I learned a lot of javascript and jQuery. We learned how to change the HTML content to making sliders. Learning how to make buttons (Day&Night) was so much fun. In addition, I loved moving a box by making jQuery buttons. Nothing was boring because every lab challenged me to do better and improve as a web designer. Although, jQuery got a bit difficulty because you had to name the Ids/Class Names different. Overall, I found all the labs fun and interesting.

I can improve this term by using my time very wisely and making sure I learn every skill to the fullest. Since, its my last term in web design, I will try to enjoy everything and try my best to improve and develop more as a web designer. Everything I experienced  in the fall is vital because it helps me gain better web client programming skills. In addition, it improved me and helped me gain more knowledge of being a web designer.

Some of my Fall Term Labs :

In lab 1, we had to create our first JavaScript. We learned how to change the content of an HTML element using JavaScript by creating a button that says "Click Me!" We used the code <button type= "button" onclick= "myFunction()"> Click Me!</button> to create a button. Below the button, it says "This is a demonstration" but when someone clicks on the button, it changes to "Hello JavaScript."
In lab 11, we had to change the content of an HTML page by using jQuery for the first time. The first step of this lab was to attach our jQuery file to it otherwise, it wouldn't work. The "day" button is for a sunny background while, the "night" button is for a dark background and the reset button changes the background to the original background of the page.


In lab 14, we had to create an article that included blockquotes. Basically, we had to put the main quotes from our article on a block next to our paragraph. As you can see, I added 2 blockquotes inside my web design design article. I did this using jquery and javascript.
                                                     
                                                         My Fall term Projects :

PAGE1.JPGFor project 1, I created a sarcastic website about how college is "useless". Basically, it was about how colleges put too much stress on students and you can end up with a lot loans. I choose this topic because a lot of people don't take college seriously so, I wanted to show that college is one of the most important steps in your life and without a college degree, you could be basically be jobless. In addition, since we are all also going to college soon, I thought this would be a fun topic to do.
In project 2, we had to create a website based on a radio we choose. We had 4 options: ThisAmericanLife, TheMoth, Freakonomics, and RadioLab. I ended up choosing freakonomics because it had a great variety of different topics and was very interesting to listen to. Choosing a podcast was a little hard because there was so many good ones but I ended up choosing, "Why vampires are good for the economy?"