Monday, June 15, 2015

3 Years Reflection


The 3 years of web design was such an amazing experience to have that I can carry with me throughout my life. Not only did I learned many skills but I discovered myself. I remember receiving computer fundamentals in freshman year and learning basic Photoshop skills.
Mr. Vanderputten was the one who made me interesting in web design because I remember him coming to my global class to give a presentation. Out of all the courses, I really liked web design. In sophomore year I was so excited to start off this course and learned Photoshop skills. I did't really cared about being the best, I just wanted to improve and learn as much as I could. I remember doing the Quinoa project, creating a brochure, newsletter and a yearbook. I really liked doing the newsletter because I like writing and I got to use InDesign. In addition, I made an hawk for my group using illustrator to use in the ITHS newsletter. Mr. Vanderputten was a great teacher who always told me what I can improve on and helped me move to the next step of becoming a web designer. In junior year, I still remember creating my first website. I was so happy when we uploaded our first webpage. Creating logos/banner was so much fun because that's when we got to be creative. The favorite cartoons project was so much fun because we got to draw and color them using Photoshop. In addition, the favorite teacher was a nice project since, Mrs. Jarmillio really liked the website I created for her. It was such  nice way to show appreciate for a teacher. Flash was mine favorite unit in junior year because we did animations and cartoons. I know I had to improve a lot and Mrs. Ramirez always helped me out whenever I needed help. As senior year started, we started with Javascript and then we went into jQuery. This year had to be the hardest because I wasn't really good with JavaScript and jQuery that much. However as,we went along, I improved throughout my projects. The sarcastic project 1, radio project 2, Economy Project 3, Cartoonist Project 4, and NYC Tourist Project 5 was such a amazing ride. I really improved from project to project as we learned more and more HTML skills. I can't believe I achieved 3 years of web design, it did got hard at times but it was all worth it. Learning not only HTML skills but also, workplace skills was great also. I learned how to be professional while being a workplace and how to present a project. I had my first ever internship and I learned a lot about being responsibility. Thank you so much Mrs. Ramirez for such amazing 3 years! You are such an amazing teacher I will never forgot and thank you for always believing in me!

                                            We did it, Class of 2015: Web Design!!!!

Final Project : WCP Portfolio

For my final portfolio, I made it into a one page website to make it easier for the user to follow. The user can go to page to page by clicking the arrow however, I added a navigation bar to make it more easier for the user. I added a introduction page to make the user welcome and a about me page to let the user know a little bit about me. In the labs/projects page, I linked all my work by buttons. In addition, in the DD/WCP work, I decided to add the logos,cards,etc. because I had to use all the skills I learned in the 3 years of web design to make them. I added a contact page to let the user ask me a question or give any suggestion after viewing my entire website.

I really enjoyed creating this portfolio because I had to put in all the skills of a web designer into creating it. I can't believe this is the last website we had to make for our web design class. Its been a wonderful experience seeing myself learn and improve by my mistakes. I tried my best into creating all my work and enjoyed all the labs/projects.

Project 5 : NYC Tourist Website

For project 5, I choose to make a NYC Tourist Website. The four places I choose was MET Museum, Times Square, Central park, and FIT Museum. For each place, I made 3 pages including history, things to do, and tours. In the history page, I wrote some interesting facts about each place. In things to do place, I added gallery's to show the how the place looks like and what are the top must see art pieces the place have. In tours page, I added the different types of tours available in the place. I included a header for each page with a image that displayed the place and added a navigation bar with the following pages: History, Things to Do, and Tours.

The extra pages I included was Contact, Souvenirs, and Travel. For the contact page, I included a contact form where the user needs to fill in their name, email, and message in order to submit it. For the souvenirs page, I included NYC items and linked it to where the user can but it online. I added extra websites to give the user more options. In the travel page, I included where they can buy tickets t come to NYC and where to rent a hotel to stay. I included these pages to help the user if they have any questions or want to buy something. After visiting all my pages and they decide to come to NYC, they can go to the travel page to find out more information about traveling to NYC.

Monday, June 8, 2015

WCP Session 2 : Youth Workers

Young workers should know their rights and how to protect themselves before they start working. Youths have the right to work in a safe place and receive safety. Its very important to ask questions if you are unsure of anything to avoid mistakes and use safety gear if required. If you believe the workplace is not safe, you have the right to file a confidential complaint with OSHA. Employers have responsibilities too by providing you a safe workplace that follows all the OSHA safety/health standards. In addition, they have to give you proper training and answers any questions you might have. To stay safe on a job make sure to protect yourself by following all the safety rules and report any unsafe conditions to a shift/team leader or supervisor.

5 Rules : Youth On The Job

#1: You have the rights to get paid, overtime pay, be safe, freedom from harassment and discrimination, and organize. OSHA is a federal government agency that develops and enforces job safety laws. They make sure young workers stay protected.
#2: There are many hazards at work so make sure to always protect yourself. Always know your rights, speak up, get together, wear protective equipment, and ask for training. Many young workers get injured at work. The top five categories of young workers who was injured are agricultural workers, retail workers, construction workers, services, and manufacturing. Avoid using equipment that might be risky and make sure you know what you are doing. 

#3: Stand up for your rights! You have a right to know your rights/responsibilities on the job as a worker, use organizing and problem solving tools to create a safe workplace, and remember you are not alone. Some tips for problem solving are to plan in advance, keep records, be strategic, be prepared for different responses from management and be creative. Young workers get injured due to insufficient training, inexperience, dangerous/inappropriate jobs and lack of supervision.
 What to do if you experience hazards at work?

Create a plan of action : 
Get together with co-workers Map your workplace
Survey your co-workers
Get employer records
Get info from OSHA & NIOSH
Go to the union.
                                                                                                                                                                      #4: Sticks & Stones can break your bone but RSIs can really hurt you. Repetitive Strain Injuries (RSIs) are work-related injuries that result from overuse of muscles, tendons, ligaments and nerves. To stop RSIs ask your boss for proper workstation design, avoid award positions and take mini-breaks.

#5: Chemical exposure can be dangerous for all workers and you have the right to know what risks they may pose to you and your co-workers. Follow the hierarchy of controls to protect yourself because chemicals can get into your body in a variety of ways. 
#6: Violence on the job is a big concern for young workers. If you are experiencing sexual harassment make it clear to the harasser that his/her behavior is unwelcome, keep a record by writing down what is happening to you, talk to co-workers to support your account and file a complaint. Employers should correct any unsafe conditions to prevent incidents of violence. 

WCP Session 1 : Birkman Personality Test

The Birkman Personality Test is a behavioral assessment that shows you what type of job fields you fit into. In addition, it gives you a color code that gives you a lit of jobs your personality fits into. This method is perfect for students who are getting out of high school and is confused of what career to pursue. In addition, this method helps adults who are struggling to know if they are in the right workplace. It lets you have a idea of where you belong and which job field you belong to.

   Whats my color code?
 
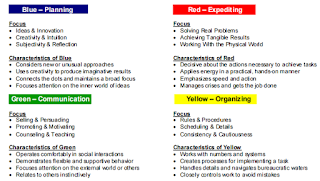
After taking the Birkman personality test, i found out my two colors: Blue/Yellow. For interest, I got blue and for style, I got yellow. Using these two colors, I can find out what type of jobs fit my personality. As you can see on the image on the right, Blue means I like being innovation and creative. In addition, I like working with Rules & Procedures according to yellow. Both of them colors do fit my personality because I do like planning and organizing before starting a task.

                                                                Job Fields
 
Keeping in mind my two colors will help me make a better decision when I am choosing a job field.One of the job field that fit my personality is  Education&Training because it does require a lot of planning. In addition, Information Technology because I do like being creative and designing. 

Tuesday, May 5, 2015

Project 4 Review

Project 4: Client Website

Goal: Create a client website displaying his artwork.
Client: Sam E. Berland Cartoonist
Softwares:
  • Photoshop
  • Dreamweaver 
  • Flash 
  • Javascript 
  • jQuery 
  • CSS 
Team PowerLadies:
  • Giselle Vanegas 
  • Akampreet Kaur 
  • Malaysa Miranda 
Me and my team decied to use one shared dopbox folder. Wr maded it Proejct 4 and kept it organized s, everyone would know where all the pages are located. We used HTML, CSS, Javascript, and jQuery for all the pages.


In this site map it shows the web pages of Sam Berland's website. The squares show the Web Pages we planned to have in the website. The arrows show where the pages are located. The navigation would be used in every page to make the website easier for the user to use.


For the layout, we decided to use a color combo to make the colors
match on our website.


                                           We used CSS to build up our layout.      

                                              Some examples of the CSS-Assets


  Final Site


HOME PAGE


ABOUT PAGE


GALLERY PAGE


EVENTS PAGE


FAQ  PAGE


CONTACT PAGE


In project 4, I learned a lot about web design skills and working as a team. I am usually not that good using time management but having a great group really helps. We were very organized and planned everything well. In this project, I did the gallery,events, and the contact page. I competed them on time I was supposed too. Malaysa did the events page but I just worked a little bit more on it since, she was working on something else. One of the thinsg I learned during this project was using the <div> tags, we used CSS for our layout and it helped me improve my CSS skills.

     Overall, I think this project went very well because we had everything well planned. I think dividing the pages was a good idea so, everyone has a page to do. I had fun doing the gallery and putting Mr. Berlands's work together. Since, I am always a leader on group projects, it was a bit different this project because Malaysa was the leader. However, it was a great experience and I learned to develop great teamwork skills.

Friday, March 20, 2015

Project 3 Review

For project 3, we had to create a website on everything we learned about the financial and management world. My group decided the theme to be old vs new economy for our website. I created the logo for my team name (TAJD) and added it on every page. Our theme colors was grey, green, and blue which we kept on every page. 


On our homepage, we made a banner where we included the money sign black/white and colorful to represent our theme (Old vs New). 


On the second page, we made a page explaining the difference between old economy and the new. We decided to put all the information in a chart to divide the two topics. 


The third page was about economy and the three main causes of it including inflation, salary, and devaluation. We made chart that increase/decrease when you visit the website using jquery. Going back to the chart idea, we did the same thing for the third page, dividing the different topics in 3 columns. 


The fourth page we made was about businesses today and what are the requirements to have a business.  


The fifth page was about consumer choices explaining how we as consumer help the economy make choices. 


The last page was a contact us page where we included our images and a contact form.


In order to do this project, we had to do a lot of planning and research. First, we created wireframes to help us give an idea to what we were creating. We had to do a lot of research about the topic we included throughout the pages. We divided up the work. I was in charge of putting all the pages together and making the layout. In addition, I did the research for the old economy vs new economy page and the choices page. James did the research for inflation; Tenzin did the research for salary and for the businesses page. ; Demetri did the research for  devaluation. We all divided up creating logos/sliders also. I think we improved a lot from what we started with because we had a whole different idea of how this website was going to look like. As we get along the way, we improved and ended up with this idea. We worked as a great team because everyone was doing something and we all communicated great. Project 3 taught me great team work and more advanced javascript/jquery. In addition, doing this website, I learned a lot about the economy and how it improved along the way.

Thursday, February 26, 2015

Career & Financial Management Part 2


        Teacher
 (New York City)
    Web Designer     
    (Los Angeles)
     Kindergarten   
     Teacher (Paris)
Salary
$45,530
$67,000
$23,000
Gross Monthly
$3,794
$5,583
$1,916
Net Salary
$682.92
$1,005
$345

   Gross salary is an aggregate amount of wages received on a regular basis, usually weekly, biweekly, or monthly prior to any deductions such a federal and state taxes. An individual's gross salary is one factor that is used by creditors to determine if credit will be extended to the individual and his/her ability to repay the funds. On the chart above, you can see the three gross salary in different city's. The total cost of my living expenses is $723.92. Net salary is the salary which is left deducting tax and National Insurance contributions. One of the good things about calculating your expenses is you know how much you will have after all your spending or to see if you will have enough to pay your expenses. The net salaries I calculated: of a teacher in New York City  ($682.92), web designer in Los Angeles ($1,005), and Kindergarten teacher in Paris ($345). 

   Calculating my gross salary and net salary now will help me a lot in the future. Creating a plan will make everything easier because you know what you have to do in order, to reach a certain point.Since my net salaries is not a lot so, I might have to do a little of budgeting. Budgeting can help me manage my living expenses much easier. I have to spend according to what I need most so, I don't spend a lot and still have some extra money for emergencies. Doing all the calculations on the household budget worksheet, I realized you have spend carefully because you have to pay fixed expenses, have some savings, and living expenses.


       How to Budget :
1. Forecast your monthly income
2.Forecast your monthly expenses
3.Balance your worksheets
4. Spend according to your plan
5. Compare your actual earning and spending with your targets
6. Repeat the process

Tuesday, February 24, 2015

Career & Financial Management Part 1

 In 5 years, I see myself graduated from college and having a job to keep me financially stable.  In order for that to happen, I need to make SMART goals and create a good plan to follow.

What does a Goal need to have :
1. Be realistic : A car
2. Be specific: Honda CR-V 
3. Have a deadline: 5 Years
4. Have a price tag: $23, 445

One of my goals in 5 years is to have a car most likely a Honda CR-V. Honda CR-V costs about $23, 445. In order to achieve my goal of wanting a car, I am going to follow SMART goal setting. My target of achieving this goal would be in 5 years most likely after I graduated from college. 


One of the most important things I would do while I am trying to achieve my goals is by breaking them into small steps. For example, I would start by saving money and then, getting a job to save up for buying a car. These steps are called "milestones" meaning major tasks needed to reach the goal. Each of these milestones will help me achieve my goal. Having a goal map/written plan today will help me have a idea of what I want to achieve. If I start saving money today, it will help me achieve my future goals even faster than I think about it. Another thing to remember while I am trying to achieve my goal is my budget. Having a budget will help me save money and let me know up to what price I can spend. 


                How to Budget :
1. Forecast your monthly income
2.Forecast your monthly expenses
3.Balance your worksheets
4. Spend according to your plan
5. Compare your actual earning and spending with your targets
6. Repeat the process


                                                                 A Goal Map

Friday, February 13, 2015

CTE EXPO


On February 12, 2015, ITHS had an CTE EXPO for the freshman's. All 3 CTE classes (Web Design, Video Production, Apple) participated in this. Basically this CTE EXPO helped freshman's make their final decision while, picking the academy they want to go to. I remember a teacher giving a presentation about the different academies when I was a freshman, it really helped me a lot so, I tried my best to help answer all the questions the freshman's had doing the expo. The posters we created were lined up in the center on the tables so, the freshman's can walk around to look at our work.

The Expo was a great experience because I got to introduce freshman's to web design. I went to the Expo during periods 1, 4, 5/6, and 7. It was a lot of fun displaying my work to them. They asked me a lot of questions including what we do, what softwares we used to create our websites, etc. I loved the expo during these 3 years of web design because I get to help freshman's who really are interested in a CTE class answer their questions.
Who : Web Design / Video Production / Apple
Where : ITHS
When : February 12, 2015
What : The importance of a CTE Expo was to help freshman's give a idea of what each academy is.
How: By displaying our work to the freshman's we give them a idea of what they will be doing in the CTE class they choose.

Sunday, February 8, 2015

Work Process of a Web designer


The first step of creating a website for a client is to learn their requirements such as their target audience and goals of their website. Learning your clients exact requirements will help you save money and time. In addition, it will give you a idea of what to create.


The second step is to create a draft of how the website will look like such as a wire frame or a storyboard. A wire frame is a blueprint that includes the arrangement of a website’s content using a navigation diagram showing how the pages are organized and where the future web pages are expected to be designed. A site map is a list of pages of a website accessible to users. A story board is a sequence of drawings, typically with some directions, representing the outline for a website.

After you are done creating the wire frames and a storyboard, you need to get your clients approval. If your client doesn't give a approval, you have to redo this step until, they say yes to the design. This step will help save money and time also because you only have to change stuff on a draft instead, of starting your coding all over again.


The fourth step is to work on the website where you start writing the coding. You have to develop the website as per as your client's requirements and this is where where a wire frame and a storyboard will help you. Instead, of asking your client where you want the buttons, you can just look at your storyboard to see where it belongs.

The next step is to upload your website and troubleshoot. Look over all the pages and see if all the pages/links work properly. Fix anything that doesn't work.

After you are done troubleshooting, show the website to your client. Your client may or may not approval. If your client doesn't approval, go back to step one and start over as many times you have to make the perfect website for your client.


                                              Process of a web designer :

As a web designer, following the work process of a web designer helps a lot. Creating wire frames before creating a website helps me a lot because it gives me a idea of what I am trying to create, Troubleshooting can be difficult at times but looking over the code, you end up finding your mistake. Having to re-do a website can be a lot of work if it doesn't match the target audience or the goals but if you divide your time, it helps you a lot. Time management has to be the most important thing as a web designer because if you use your time wisely it will help you a lot in the future.